English
 Español
 Türk
TürkContent
- 1 Getting Familiar With Your Sewing Machine Before You Sew a Single Stitch
- 2 Step 1 — Wind and Load the Bobbin Correctly
- 3 Step 2 — Thread the Upper Needle Without Skipping Any Guide
- 4 Step 3 — Choose the Right Needle and Thread for Your Fabric
- 5 Step 4 — Set Your Stitch Type, Length, and Tension
- 6 Step 5 — Position the Fabric and Begin Sewing
- 7 Understanding Interlining and When to Use It in Your Projects
- 8 How to Attach Interlining to Your Fabric on the Sewing Machine
- 9 Pressing and Finishing — The Steps That Make or Break a Garment
- 10 Common Beginner Mistakes and How to Fix Them
- 11 Building Confidence With Practice Projects
- 12 Caring for Your Sewing Machine for Reliable Long-Term Performance
Learning how to work a sewing machine step by step is more straightforward than most beginners expect. The core process comes down to five actions: set up the machine, wind and load the bobbin, thread the upper needle, select your stitch, and sew. Once you have these fundamentals down, you can tackle everything from basic hems to structured garments that use interlining — a hidden layer sewn between the outer fabric and lining that adds body, shape, and warmth. This guide walks through every step in detail so you can go from complete beginner to confident sewist.
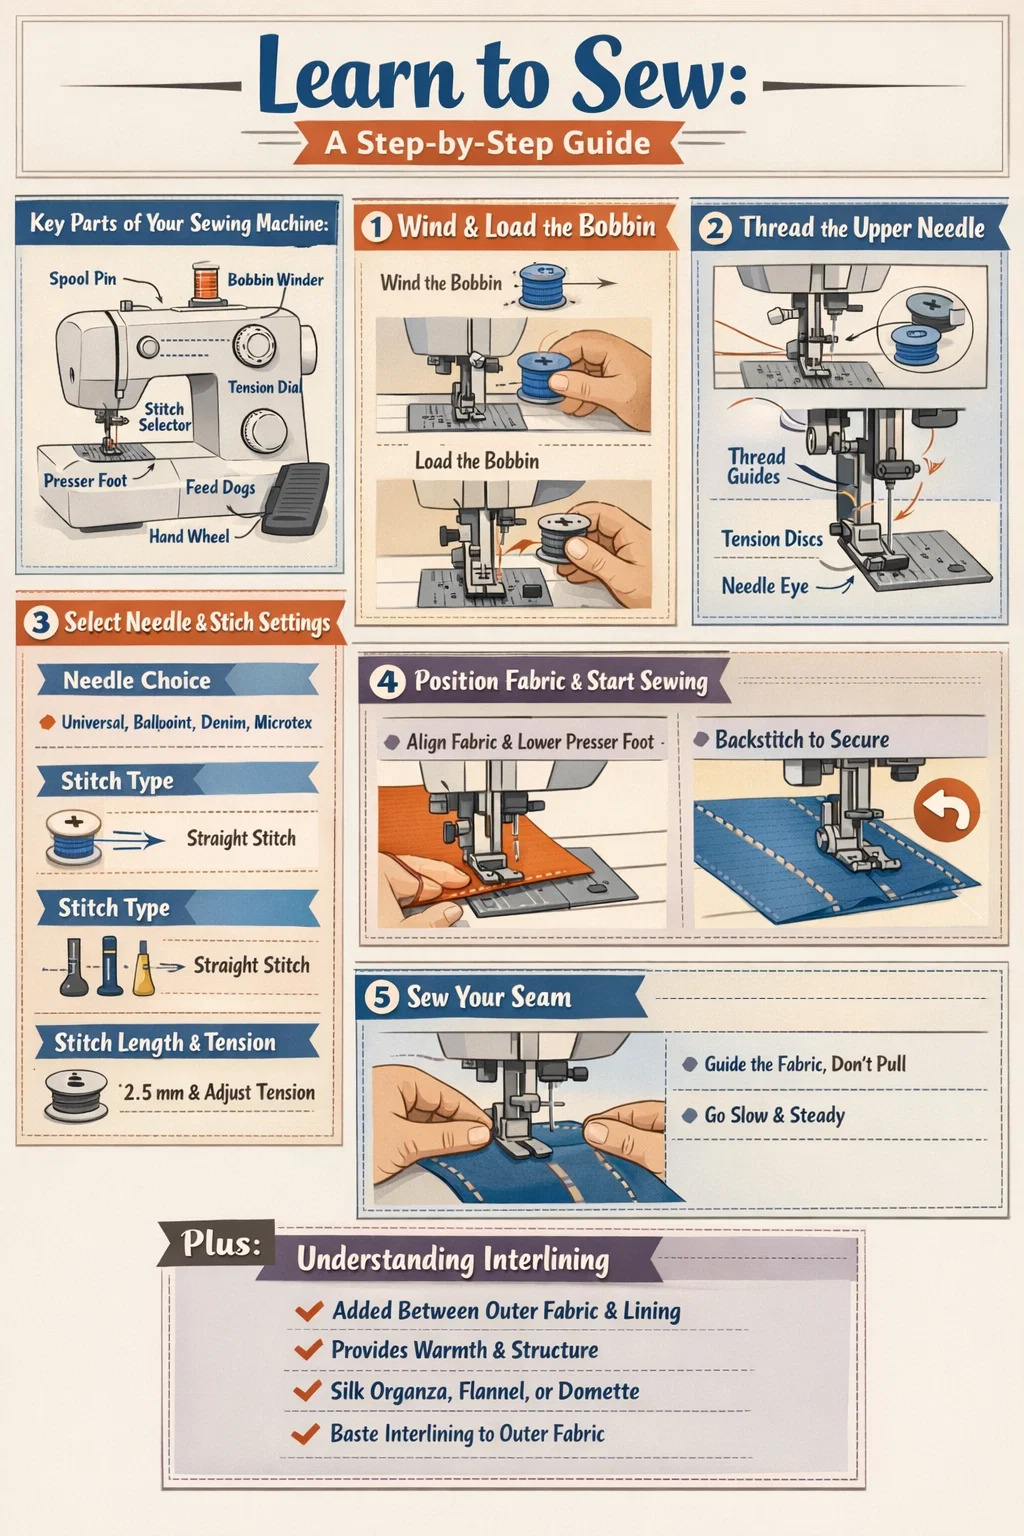
Getting Familiar With Your Sewing Machine Before You Sew a Single Stitch
Before touching a thread, spend five to ten minutes examining your machine. Whether you own a basic mechanical model like the Singer Heavy Duty 4432 or a computerized machine like the Brother CS6000i, the fundamental parts are nearly identical. Knowing what everything does prevents costly mistakes — a misaligned presser foot, for instance, will cause skipped stitches across an entire seam.
Key Parts to Identify
- Spool pin: Located on the top or side of the machine, this holds your thread spool upright or horizontally depending on machine design.
- Bobbin winder: A small spindle, usually at the top right, used to wind thread onto the bobbin before loading it below the needle plate.
- Tension dial: Controls how tightly the thread is pulled as it passes through the machine. Standard tension for most woven fabrics sits between 3 and 5 on a 0–9 scale.
- Stitch selector: A dial or digital panel that lets you choose between straight stitch, zigzag, buttonhole, and decorative stitches.
- Stitch length dial: Measured in millimeters. Most garment sewing uses 2.5 mm, while basting stitches use 4–5 mm.
- Presser foot: The metal foot that holds fabric flat against the feed dogs during sewing. Dozens of specialty feet exist, including a walking foot ideal for sewing interlining layers together without shifting.
- Feed dogs: The small ridged teeth beneath the presser foot that move fabric forward at a consistent pace.
- Needle plate: The metal plate with seam allowance markings (typically at ¼ inch, ⅜ inch, and ⅝ inch) that help you sew straight, accurate seam lines.
- Hand wheel: The large wheel on the right side that manually raises and lowers the needle — always turn it toward you to avoid thread jams.
- Foot pedal: Connected by a cord, this controls machine speed through pressure — press lightly for slow, controlled sewing or press fully for maximum speed.
Spend a few minutes pressing the foot pedal without any thread or fabric to get comfortable with controlling speed. Many beginners make the mistake of pressing the pedal fully and immediately losing control. Practice gentle, gradual pressure until the movement feels natural.
Step 1 — Wind and Load the Bobbin Correctly
The bobbin is the small spool that sits inside the machine below the needle plate. It provides the lower thread that interlocks with the upper thread to form a stitch. A poorly wound bobbin is responsible for a large percentage of tension problems and thread breaks — getting this right from the start saves significant frustration.
How to Wind the Bobbin
- Place your thread spool on the spool pin. If the thread feeds from the top, position the spool so it unwinds clockwise.
- Draw the thread through the bobbin winding thread guide — typically a small hook or slot near the top of the machine.
- Thread the end of the thread through one of the small holes on the side of the bobbin.
- Push the bobbin onto the bobbin winder spindle and slide it to the right (on most machines) to engage the winding mechanism. This usually disengages the needle so it doesn't move while winding.
- Hold the thread end loosely and press the foot pedal at a slow, steady speed. Wind for about three seconds, then clip the tail thread close to the bobbin.
- Continue winding at a moderate speed until the bobbin is full. The machine will stop automatically on many models, or you'll see the thread level out near the top of the bobbin.
- Slide the bobbin back to the left to disengage the winder, then cut the thread leaving a 6-inch tail.
Never overfill the bobbin — thread that mounds over the edge will jam inside the bobbin case. The thread should be wound evenly and sit just below the rim of the bobbin.
How to Load the Bobbin Into the Machine
Most modern machines use a drop-in bobbin system, where the bobbin is inserted from the top through a sliding cover on the needle plate. Older machines or heavy-duty models may use a front-loading bobbin inside a bobbin case. Check your manual to confirm the type.
For drop-in bobbins: slide back the bobbin cover, drop the bobbin in with the thread unwinding counterclockwise (the direction is usually marked with an arrow on the machine plate), then guide the thread through the thread slot and pull it through the small tension spring until it clicks or seats firmly. Leave about a 6-inch thread tail hanging free.
Once loaded, raise the needle using the hand wheel and lower it back down — this brings the bobbin thread up through the needle plate as a loop. Pull the loop through with a seam ripper or your fingernail, so both threads extend about 6 inches to the back of the machine.
Step 2 — Thread the Upper Needle Without Skipping Any Guide
Upper threading is where beginners most often go wrong, and a single missed guide can result in thread breaking every few inches, skipped stitches, or the needle pulling the thread out entirely. The threading path on most machines forms a rough U-shape. Follow these steps in exact order with the presser foot raised (this opens the tension discs and allows the thread to seat properly).
- Spool to first guide: Place your thread spool on the spool pin, then draw the thread to the first thread guide, usually located at the top left of the machine near the spool. Pass the thread through this guide.
- Down through the tension assembly: Pull the thread downward through the channel on the front left face of the machine. On most machines, this channel houses the main tension discs inside. You'll feel slight resistance as the thread seats between the discs.
- Around the take-up lever: Pull the thread back upward and thread it through the take-up lever — the hook that moves up and down when the machine runs. This is often the most overlooked step. If you miss it, the thread will pull free from the needle after one or two stitches.
- Down to lower thread guides: Guide the thread back downward through any small guides located just above the needle. There are usually one or two small hooks or loops here.
- Thread the needle eye: Use the needle threader built into your machine if available, or thread manually from front to back (some machines require side-to-side threading — check your manual). Pull through about 6 inches of thread.
Many machines now have numbered diagrams printed directly on the machine body above each threading point, making this process significantly easier. If yours does not, a diagram is always available in the user manual or printed on a card inside the accessory compartment.
After threading, lower the presser foot and turn the hand wheel once toward you. Both threads should pull together from the same direction — toward the back of the machine — before you begin sewing.
Step 3 — Choose the Right Needle and Thread for Your Fabric
Needle and thread selection has a direct impact on stitch quality. Using a denim needle on a silk blouse, for instance, will cause runs and holes. Sewing machine needles are sized by two numbers: the American size (8–18) and the European metric size (60–110). The higher the number, the thicker the needle.
| Fabric Type | Needle Size | Needle Type | Thread Weight | Stitch Length |
|---|---|---|---|---|
| Lightweight silk, chiffon | 60/8 – 70/10 | Microtex / Sharp | 50 wt. cotton or polyester | 1.5–2.0 mm |
| Cotton quilting fabric | 80/12 | Universal | 50 wt. cotton | 2.0–2.5 mm |
| Knit / jersey | 75/11 – 90/14 | Ballpoint / Jersey | Polyester or wooly nylon | 2.5–3.0 mm |
| Woven suiting, canvas | 90/14 – 100/16 | Universal | 40 wt. polyester | 2.5–3.0 mm |
| Denim, heavy canvas | 100/16 – 110/18 | Denim / Jeans | Heavy duty cotton or polyester | 3.0–3.5 mm |
| Interlining + outer fabric combined | 90/14 – 100/16 | Universal or Sharp | 50 wt. polyester | 2.5 mm |
Replace your needle every 8–10 hours of sewing time or after every major project. A dull needle is the leading cause of skipped stitches and pulled fabric threads — something particularly noticeable when sewing through the added thickness of interlining.
Step 4 — Set Your Stitch Type, Length, and Tension
Three settings determine the character of every seam you sew: the stitch type, the stitch length, and the thread tension. Getting all three correct before you place fabric under the presser foot saves you from picking out seams and starting over.
Stitch Type
The straight stitch is used for the vast majority of seams. The zigzag stitch is used to finish raw edges and sew stretchy fabrics. Modern machines include anywhere from 10 to 200+ stitch patterns, but as a beginner, you'll use the straight stitch for 90% of your work. Set your machine to the straight stitch symbol — usually a single dashed line on the stitch selector.
Stitch Length
Shorter stitches (1.5–2.0 mm) create strong, tightly locked seams ideal for curves and stress points. Standard seams on woven garments use 2.5 mm. Basting stitches — temporary stitches used to hold layers like interlining in place before permanent sewing — use 4.0–5.0 mm because they're designed to be pulled out easily after the final seam is sewn. Set the stitch length dial to 2.5 mm when you're starting out.
Tension
Correct tension produces a seam where the stitch knot is buried in the center of the fabric layers — not visible on either the top or bottom surface. To test your tension, sew a 6-inch test seam on a folded scrap of your project fabric and examine both sides:
- If the bobbin thread is being pulled to the top surface, the upper tension is too tight — lower the tension number.
- If the upper thread is looping on the bottom surface, the upper tension is too loose — increase the tension number.
- If both surfaces look identical with no visible loops, your tension is correct.
When sewing through interlining and outer fabric together, you may need to increase your tension by 0.5 to 1 point compared to sewing a single layer, since the machine is pulling thread through additional thickness. Always test on a scrap with all intended layers before sewing your actual project.
Step 5 — Position the Fabric and Begin Sewing
With machine threaded, stitch settings dialed in, and your fabric ready, it's time to actually sew. This step is where technique and habit begin to form, and small details here make a meaningful difference in the quality of finished seams.
Placing the Fabric
- Raise the presser foot lever (located at the back right of the machine head) to its highest position.
- Slide the fabric under the presser foot so the raw edge aligns with your desired seam allowance mark on the needle plate. For most garment sewing, this is the ⅝-inch mark.
- Position the fabric so the seam begins approximately ½ inch from the top edge. This gives you room to backstitch at the start without sewing off the fabric entirely.
- Lower the presser foot. The feed dogs will now grip the fabric from below.
- Hold both thread tails toward the back of the machine so they don't get pulled under the needle plate and create a thread nest on the underside of your fabric.
Backstitching to Lock the Seam
Every seam must be secured at both the beginning and end, or the stitching will unravel. To backstitch: press the reverse button or lever on your machine, sew backward 3–4 stitches, then release the reverse and sew forward. Repeat this at the end of the seam. This overlapping knot of stitches will not come undone with normal wear, and takes less than 5 seconds to do.
Guiding the Fabric
Let the feed dogs do the work of moving fabric through the machine. Your role is to guide, not push. Place your left hand flat on the fabric a few inches ahead of the presser foot, keeping it flat and aligned with the seam allowance marking. Your right hand can lightly support the fabric behind the presser foot. Never pull fabric from behind — this bends the needle and can cause it to break, and it also distorts the fabric grain.
Sew at a pace that lets you stay in control. When starting out, sewing slowly and accurately is vastly more valuable than speed. Experienced sewists sew fast because they've already internalized the muscle memory — not because speed itself is the goal.
Understanding Interlining and When to Use It in Your Projects
Once you're comfortable with the basic mechanics of sewing, you'll quickly encounter projects that call for interlining — and understanding this material will open up a much broader range of garment types and quality levels.
Interlining is a layer of material sewn between the outer fabric (the fashion fabric) and the lining of a garment. It differs from interfacing — a stiffer material fused or sewn to a single fabric layer to add structure — and from batting or wadding, which is thick and used for warmth or quilted texture. Interlining sits sandwiched invisibly inside the garment and serves one or more of the following purposes:
- Warmth: Flannel, wool domette, and fleece interlinings add insulation without changing the external appearance of the garment. A tailored wool coat, for instance, may have a wool domette interlining throughout the body to increase warmth by effectively doubling the insulating layer.
- Body and drape: Silk organza used as interlining gives lightweight fabrics more substance and helps them hold their shape through the day. Evening gowns in silk chiffon often rely on silk organza interlining to prevent the outer layer from clinging or appearing shapeless.
- Opacity: Light-colored or sheer fabrics that would otherwise be see-through are made opaque with an interlining cut from a matching or neutral fabric.
- Reducing stretch: Loosely woven fabrics that might stretch or distort with wear can be stabilized by an interlining that prevents movement at the grain.
Common Types of Interlining Fabric
- Wool domette (also called bump): A loosely woven wool or cotton/wool blend with a fluffy, raised texture. The most traditional interlining choice for wool coats and structured garments, it provides exceptional warmth with minimal added weight.
- Flannel: A softer, lighter alternative to domette. Used in jackets and lighter coats where some warmth is wanted without the full weight of domette.
- Silk organza: Crisp, lightweight, and nearly transparent. The luxury choice for adding body to evening wear or structured blouses without adding warmth or weight.
- Cotton muslin: An affordable woven interlining used when opacity and slight body are needed. Common in home sewing for curtains and draperies, as well as lightweight structured garments.
- Synthetic fleece: A modern interlining option for casual outerwear. Polyester fleece interlinings are machine washable, lightweight, and provide significant warmth, making them popular in contemporary sportswear and casual jackets.
How to Attach Interlining to Your Fabric on the Sewing Machine
Sewing with interlining requires a slightly different approach than sewing a single layer. The goal is to treat the outer fabric and the interlining as a single unified piece before any garment assembly begins. This process, called catch-stitching or basting the interlining, prevents the layers from shifting during construction — a shift of even 3 mm can cause visible pulling or bubbling in the finished garment.
Machine Method: Basting the Interlining to the Outer Fabric
- Cut your interlining pieces: Use the same pattern pieces as the outer fabric. The interlining is cut to exactly the same size and shape as each panel. Some sewists trim 3–5 mm from the seam allowance edges of the interlining to reduce bulk at seams — this is optional but helpful with thicker interlining types like domette.
- Align the layers: Place the interlining on the wrong side of the outer fabric piece, with edges aligned exactly. Smooth from the center outward with your hands to eliminate any air pockets or fullness.
- Pin or hand baste: Pin the layers together every 3–4 inches across the entire surface, or use long hand basting stitches in a grid pattern before machine sewing. This extra step prevents the layers from creeping during sewing.
- Machine baste the perimeter: Set your machine to a basting stitch length of 4.0–5.0 mm. Sew around the perimeter of the piece, ¼ inch from the raw edge, treating both layers as one. This permanently — but removably — joins them so they behave as a single piece through all subsequent sewing steps.
- Proceed with pattern instructions: From this point, treat the basted pieces exactly as you would a single fabric layer. Sew seams, press seams open, attach lining, and complete construction per the pattern.
A walking foot is strongly recommended when machine basting interlining to outer fabric. This presser foot attachment has its own feed mechanism that moves the top layer of fabric at the same rate the feed dogs move the bottom layer — preventing the common problem of the upper layer creeping forward and creating a ripple or tuck in the basted piece. Walking feet are sold separately and are compatible with most home sewing machine brands for under $30.
Using Interlining in Specific Garment Areas
Interlining does not always need to be applied across an entire garment. In some construction approaches, it's used selectively:
- Coat fronts and backs only: The body panels carry interlining for warmth while sleeves use a lighter flannel or nothing at all, reducing overall weight.
- Skirt panels: A single layer of silk organza interlining in a floor-length silk skirt gives the fabric enough body to stand slightly away from the legs rather than clinging with every step.
- Curtains and draperies: A common home sewing application for interlining is between the face fabric and lining of curtains, where bump or domette interlining adds thermal insulation and helps curtains hang with a luxurious, hotel-quality fullness.
Pressing and Finishing — The Steps That Make or Break a Garment
Professional tailors use a phrase that beginners rarely hear until much later: "sewing is 50% pressing." Every seam you sew should be pressed before the next seam is sewn across it. This is even more critical when working with interlining, where unflattened seam allowances can create visible ridges on the garment's exterior.
How to Press Seams Correctly
- After sewing a seam, press it flat first — iron along the seam line as it was sewn, without opening the seam allowances. This "sets" the stitches into the fabric and flattens any puckering.
- Open the seam allowances and press them to either side — or press them open, depending on your pattern instructions. Use the tip of the iron directly on the seam allowance fold.
- For interlining seam allowances: trim the interlining seam allowance slightly narrower than the outer fabric allowance (by about 3 mm) to reduce bulk. Grade the seam allowances if you have multiple layers — each layer trimmed slightly narrower than the one outside it.
- Use a pressing cloth between the iron and your fashion fabric to prevent shine or scorching, particularly on wool, silk, or velvet. A damp pressing cloth helps press seams crisply without flattening the surface texture of wool fabrics.
Finishing Raw Edges
For garments without a lining, raw seam allowances will fray over time unless finished. Common methods include:
- Zigzag stitch: Set the machine to a medium-width zigzag (width 3.0, length 2.5) and sew along the raw edge. Quick and effective on most fabrics.
- Serger/overlocker: Trims and encloses the raw edge in a single pass. Not every sewist owns a serger, but if you do, this is the most professional-looking finish.
- Hong Kong finish: A strip of lightweight bias tape sewn around each seam allowance edge. Time-consuming but beautiful and used in couture construction where garments are fully visible inside when open.
- Pinked edges: Cutting with pinking shears creates a zigzag edge that slows fraying. Not a permanent solution for garments that will be laundered frequently, but fine for fabrics that fray minimally.
When interlining is present, the raw edge of the interlining layer is typically included in the seam and finished together with the outer fabric edge — or it may be trimmed back from the edge so it isn't caught in the zigzag or serged finish at all, depending on the weight of the interlining.
Common Beginner Mistakes and How to Fix Them
Even experienced sewists return to the troubleshooting stage regularly. Knowing what's wrong and why helps you solve problems in seconds rather than hours of guesswork. The following are the most frequently encountered issues when learning how to work a sewing machine step by step.
Thread Breaking Constantly
This is almost always a threading error. Re-thread the entire machine from scratch with the presser foot raised, making sure the thread seats into the tension discs and through the take-up lever. If it still breaks, try a fresh needle — a needle with even a tiny burr on its tip will shred thread in seconds. Also check that you're using the correct thread weight for the needle size: a heavy thread through a fine needle (size 60–70) will snap under pressure.
Skipped Stitches
Most commonly caused by a needle that's incorrectly installed (not pushed all the way up into the clamp), installed backward, or dull. Also check that you're using the right needle type for your fabric — sewing a ballpoint needle through tightly woven cotton will produce skipped stitches on a regular basis. When working with multiple layers including interlining, a skipped stitch usually signals the needle isn't strong enough for the combined thickness.
Bird's Nest of Thread Under the Fabric
This tangle of thread on the underside of fabric at the start of a seam is caused by not holding the thread tails to the back of the machine before starting. It can also result from the bobbin being incorrectly threaded — specifically when the thread isn't seated in the tension spring of the bobbin area. Re-thread the bobbin completely and ensure you hear or feel the thread click into the spring.
Uneven Seam Lines
The most reliable fix is to use the seam allowance markings on the needle plate as your guide, keeping your eyes on the marking rather than the needle while you sew. Sewing at a slower speed also dramatically improves accuracy. For those who struggle with straight seams, magnetic seam guides or adhesive seam guides attached to the needle plate provide a physical barrier to guide fabric against.
Layers Shifting When Sewing Interlining
When sewing multiple layers including interlining, the upper layer naturally advances faster than the lower layer due to friction from the presser foot. Solutions include using a walking foot, pinning more frequently (every 2–3 inches rather than every 4–5), and sewing at a slower speed. For very thick interlining like wool domette, reducing presser foot pressure (if your machine has this adjustment) lets the feed dogs move all layers more evenly.
Building Confidence With Practice Projects
The fastest path from beginner to competent sewist is completing actual projects in order of complexity. Each project solidifies the basics while introducing one or two new skills. The following sequence is used by many sewing instructors to build skills in a logical progression:
- Pillowcase: Straight seams, pressing, and simple finishing. Takes 30 minutes and gives satisfying results immediately.
- Tote bag: Box corners, handles, and reinforced stress points. Introduces sewing through multiple layers — good preparation for interlining work.
- Elastic-waist skirt or pajama pants: Simple shaping, a casing, and understanding grain. First garment for most beginners.
- Lined curtains with interlining: An excellent interlining introduction project. Curtains are forgiving in fit, the scale is large enough that basting and layer management are clearly visible, and the finished result shows immediately and practically why interlining matters — the curtains hang with a fullness and body that uninterlined curtains simply cannot achieve.
- Simple jacket or coat: Full interlining application, collar construction, sleeve setting, and lining. A substantial project that requires all the skills built in previous projects.
Most beginner sewists who practice consistently — even just 2–3 hours per week — develop solid foundational skills within 3–6 months. The investment in learning how to work a sewing machine step by step pays off across decades: a basic jacket pattern sewn in a high-quality wool with proper interlining will outlast and outperform mass-market garments purchased at 10–20 times the fabric cost.
Caring for Your Sewing Machine for Reliable Long-Term Performance
A well-maintained sewing machine will last decades. The most basic maintenance takes under five minutes and prevents the majority of mechanical issues.
- Clean the bobbin area after every project: Remove the bobbin and bobbin case (or the drop-in cover), and use the small brush included with your machine to sweep out lint. Thread fibers and fabric dust accumulate around the feed dogs and tension mechanism with every sewing session, and buildup over time causes inconsistent stitch quality.
- Oil the machine every 3–4 months: Mechanical machines require a drop of sewing machine oil (not WD-40 or general lubricant) in the designated oil ports — typically visible after removing the bobbin area cover. Computerized machines often do not require oiling, or have sealed bearings — check your manual before applying any oil.
- Cover the machine when not in use: Dust is the primary enemy of sewing machines. A simple hard cover or fabric dust cover keeps the tension mechanism and internal parts free of the fine particles that accumulate even in clean environments.
- Professional servicing every 2–3 years: Even with excellent home maintenance, a professional technician should clean, oil, and adjust the timing of your machine every few years. The cost is typically $60–$100 and extends machine life significantly. If you sew heavily — more than 5 hours per week — service annually.
When you sew with interlining fabrics regularly — particularly loose-weave interlining types like wool domette or flannel — lint accumulation accelerates noticeably. Clean the bobbin area more frequently: after every 2–3 hours of sewing with interlining rather than after each full project. The extra few minutes spent cleaning directly translates to consistent, smooth stitching through all layers.