English
 Español
 Türk
TürkContent
- 1 How to Use Interfacing: The Direct Answer
- 2 Interfacing vs. Interlining: Understanding the Difference
- 3 Types of Interfacing and When to Use Each
- 4 How to Choose the Right Weight of Interfacing
- 5 Step-by-Step: How to Apply Fusible Interfacing
- 6 Step-by-Step: How to Apply Sew-In Interfacing
- 7 Where to Use Interfacing in Different Projects
- 8 How to Use Interlining in Garment Construction
- 9 Common Interfacing Problems and How to Fix Them
- 10 Interfacing for Specific Techniques: Embroidery, Appliqué, and Quilting
- 11 Practical Tips for Buying and Storing Interfacing
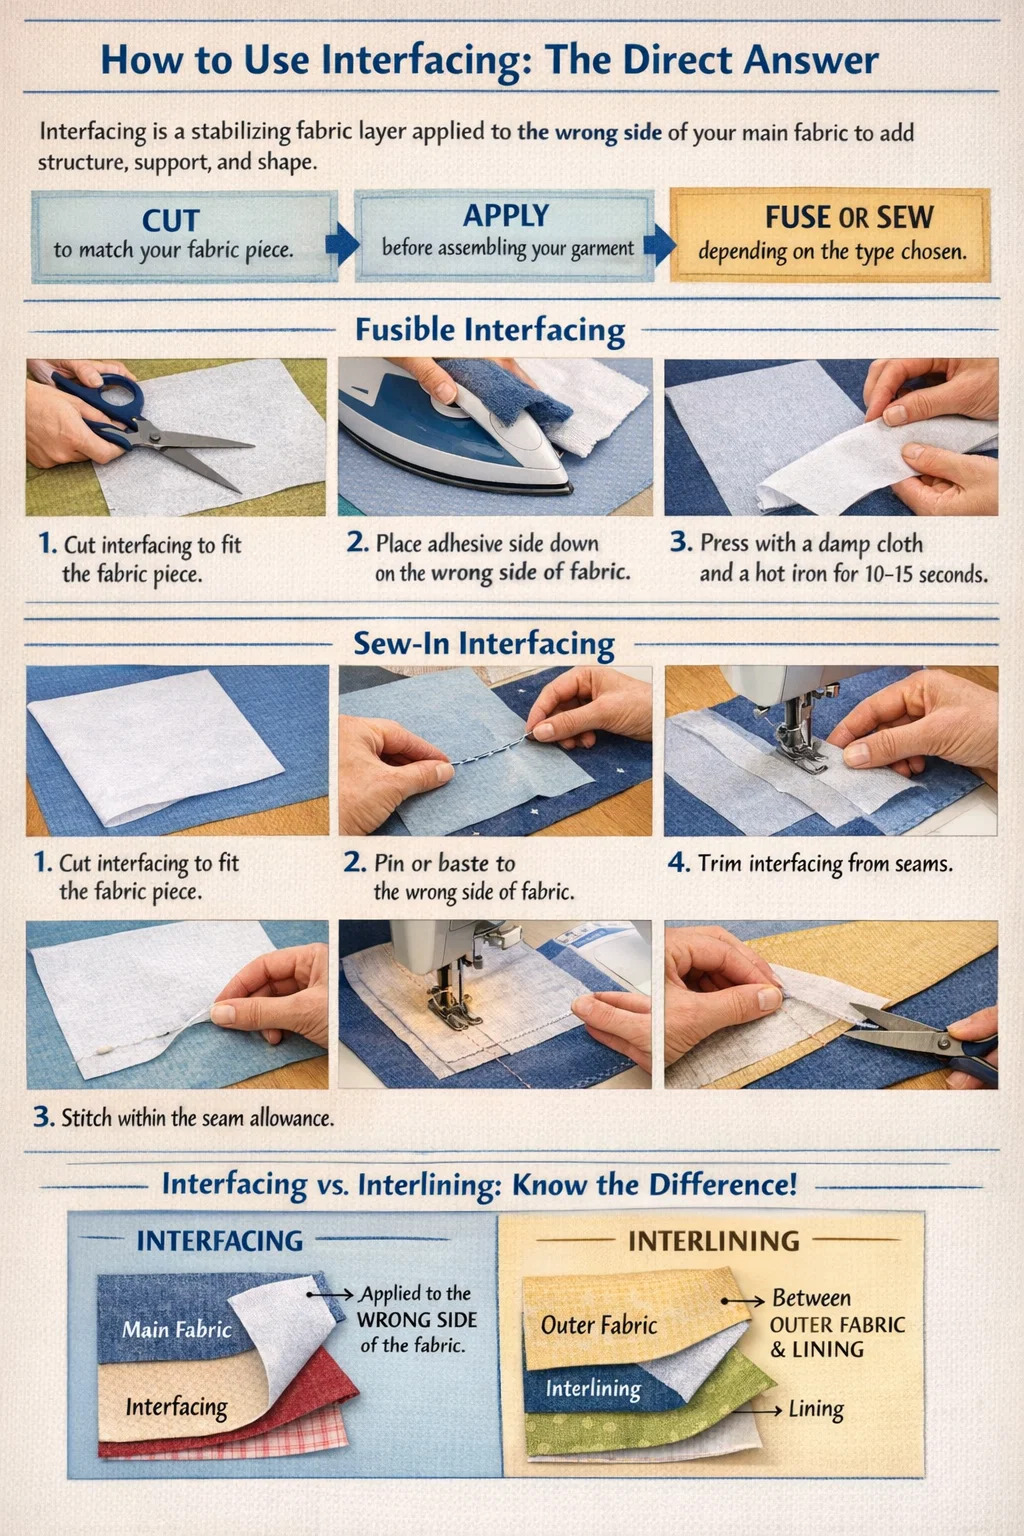
How to Use Interfacing: The Direct Answer
Interfacing is a stabilizing fabric layer applied to the wrong side of your main fabric to add structure, support, and shape. To use it correctly: cut it to match your fabric piece, apply it before assembling your garment, and fuse or sew it based on the type you have chosen. For fusible interfacing, press with a damp cloth and a hot iron for 10–15 seconds per section without sliding the iron. For sew-in interfacing, baste it to the wrong side of your fabric piece within the seam allowance. That is the core process — everything else is about choosing the right type and weight for your specific project.
Interlining, while often used interchangeably with interfacing in casual conversation, is technically a separate layer placed between the outer fabric and the lining — primarily for warmth or extra body rather than structural support. Understanding the distinction between interfacing and interlining will save you from making costly fabric mistakes, especially on tailored garments, outerwear, or structured bags.
Interfacing vs. Interlining: Understanding the Difference
Before diving into application techniques, it is worth getting the terminology straight, because confusion between interfacing and interlining leads to incorrect fabric choices and disappointing results.
What Interfacing Does
Interfacing is bonded or sewn directly to the wrong side of a single fabric layer. Its job is to add firmness and prevent stretching in high-stress or structural areas. You will find it behind collar pieces, cuffs, waistbands, button plackets, neckline facings, bag panels, and pocket flaps. It becomes part of that fabric layer permanently.
What Interlining Does
Interlining sits as an independent layer within the construction of the garment — sandwiched between the outer shell and the inner lining. It is used to add warmth (as in a wool coat with a flannel interlining), opacity (for sheeer fabrics), or extra body to curtains and home décor. Unlike interfacing, interlining typically spans the full garment panel rather than targeted sections.
| Feature | Interfacing | Interlining |
|---|---|---|
| Purpose | Structure and support | Warmth, opacity, or body |
| Placement | Wrong side of fabric piece | Between outer fabric and lining |
| Coverage | Targeted areas (collar, cuff, placket) | Often full garment panels |
| Common materials | Woven, non-woven, knit | Flannel, fleece, bump, domette |
| Application method | Fused or basted | Basted or catch-stitched |
Types of Interfacing and When to Use Each
Walking into a fabric store and facing an entire wall of interfacing options is genuinely confusing if you do not know what you are looking for. There are three main categories, and each behaves very differently.
Fusible Interfacing
Fusible interfacing has a heat-activated adhesive on one side — you can usually feel the rough, slightly bumpy texture when you run your finger across it. It bonds directly to your fabric with an iron, making it the fastest option. It accounts for the majority of interfacing sales in home sewing because of its speed and ease. However, fusible interfacing does not work well on velvet, sequined fabrics, heat-sensitive synthetics, or loosely woven textiles where the glue can bleed through to the right side.
Common fusible interfacing types include:
- Pellon 905F — a lightweight non-woven fusible, good for cotton quilting and lightweight wovens
- Pellon SF101 — a medium-weight woven fusible, suitable for structured blouses and dress bodices
- Vilene G700 — a firm non-woven fusible widely used for bag-making
- Stretch fusible — a knit interfacing with two-way stretch for jersey and stretch woven garments
Sew-In Interfacing
Sew-in interfacing has no adhesive — it is attached mechanically by stitching. This makes it the preferred choice for delicate fabrics, tailored jackets (where canvas is traditional), and any project that requires dry cleaning. Tailors working with high-end wool suiting almost always use a sew-in hair canvas or hymo interfacing to achieve that soft-roll lapel that fusible products cannot replicate. The trade-off is time: sew-in methods add several steps compared to fusible application.
Knit or Woven: Does the Construction Matter?
Yes — significantly. Woven interfacing has a grain line just like woven fabric, so it must be cut on the correct grain to avoid pulling and distortion. Knit interfacing stretches and is essential when working with stretch fabrics because a rigid interfacing on a knit garment will restrict movement and cause the fabric to pucker or tear. Non-woven interfacing has no grain and can be cut in any direction, which makes it economical and quick to use, but it also tends to feel stiffer and less drapey than woven options.
How to Choose the Right Weight of Interfacing
The single most common mistake sewists make is choosing interfacing that is heavier than their fabric. The general rule is this: your interfacing should be equal to or lighter in weight than the fabric it supports. If you put heavyweight interfacing on a fine cotton lawn, the fabric will buckle, bubble, and feel unpleasant. The interfaced area should feel supported — not stiff or board-like — unless you are constructing something like a structured bag where rigidity is the goal.
| Fabric Type | Recommended Interfacing Weight | Examples |
|---|---|---|
| Chiffon, voile, organza | Sheer or ultra-lightweight | Pellon 911FF, silk organza (sew-in) |
| Cotton quilting, lawn | Lightweight | Pellon 905F, Vilene H180 |
| Linen, medium-weight cotton | Medium | Pellon SF101, Vilene S320 |
| Denim, canvas, upholstery | Heavyweight | Vilene G700, Decovil Light |
| Jersey, ponte, stretch knit | Stretch (knit) interfacing | Pellon Easy-Knit, Vilene H609 |
When in doubt, do a test. Cut a small square of interfacing and fuse or baste it to a scrap of your fashion fabric. Handle it, drape it, and pinch it. If it feels too stiff, go one weight lighter. If it feels flimsy, go heavier. This five-minute test can save an entire project.
Step-by-Step: How to Apply Fusible Interfacing
Applying fusible interfacing incorrectly is one of the main reasons sewists end up with bubbling, peeling, or uneven results. Follow this process carefully.
- Pre-wash your fabric first. If your fashion fabric will shrink, pre-washing prevents the interfacing from bubbling after the garment is washed, since the fabric shrinks but the interfacing does not.
- Cut your interfacing piece. Use the same pattern piece as your fabric. For most applications, cut the interfacing exactly the same size. For facings, cut 1/8 inch smaller on all edges to prevent the interfacing from rolling to the right side during construction.
- Identify the adhesive side. Place the rough or slightly tacky side face-down onto the wrong side of your fabric.
- Cover with a pressing cloth. A damp pressing cloth creates steam and protects both the interfacing and the iron plate from adhesive residue.
- Press — do not iron. Lift and place the iron in sections, holding for 10–15 seconds per area with firm, even pressure. Do not slide the iron around, as this can shift the interfacing before the adhesive sets and cause misalignment or creasing.
- Allow to cool completely. Do not move or flex the fabric until it has cooled. Moving it while warm can reactivate the glue and cause the bond to weaken or shift.
- Check the bond. Try to gently peel a corner. If it separates easily, the bond is insufficient — press again with more heat or pressure. If it stays firmly in place and the fabric has no bubbles or puckering, you are ready to sew.
Iron Temperature Settings by Fabric
Using the wrong iron temperature is a common error. Too low, and the adhesive will not bond; too high, and you can scorch the fabric or melt synthetic interfacing.
- Cotton and linen: high heat (cotton setting), steam
- Wool: medium-high, pressing cloth essential, light steam
- Silk: medium heat, dry or very light steam, always test first
- Polyester and synthetics: low to medium, no steam, pressing cloth required
- Stretch knits: medium heat, gentle pressure, do not drag
Step-by-Step: How to Apply Sew-In Interfacing
Sew-in interfacing takes more time but provides a softer, more tailored result — and it is the correct choice for fabrics that cannot tolerate heat or adhesive.
- Cut to size. Use the same pattern piece as the fabric. For most tailoring applications, cut the sew-in interfacing on the same grain as your fashion fabric unless the pattern specifies otherwise.
- Place on wrong side. Lay the interfacing flat on the wrong side of the fashion fabric, aligning edges.
- Pin or hand-baste together. Use long diagonal basting stitches across the piece (not just the edges) to prevent the layers from shifting during construction. Stitches every 2–3 inches across the panel is a good rule of thumb.
- Machine stitch within seam allowance. Run a line of machine stitching just inside the seam allowance (about 3/8 inch from the edge) to anchor the interfacing permanently before you begin assembling pieces.
- Trim the interfacing from seam allowances. Once seams are sewn, trim the interfacing close to the stitching line to reduce bulk in seam areas.
For tailored lapels, pad stitching by hand is used to attach the interfacing (typically hair canvas) to the lapel fabric in a way that allows the lapel to roll naturally. This is a more advanced technique, but it is what distinguishes handmade tailoring from mass-produced garments.
Where to Use Interfacing in Different Projects
Interfacing is not used on entire garments — it is used strategically in areas that need support. Knowing exactly where to place it is just as important as knowing which type to choose.
Garment Sewing
- Collars and cuffs: Both the upper and under collar pieces, and the outer cuff piece, are typically interfaced to give them a clean, crisp finish that holds its shape through wear and washing.
- Button plackets and buttonholes: Interfacing behind buttonholes prevents the fabric from tearing and keeps the buttonhole neat after repeated use. This is non-negotiable for any garment with buttons.
- Waistbands: A waistband without interfacing will fold, roll, and lose its shape. Medium to heavy interfacing keeps waistbands firm and flat.
- Neckline facings: Interfacing on a facing prevents it from stretching out during construction and keeps the neckline edge lying flat against the garment.
- Jacket and coat fronts: The front facing of a structured jacket is interfaced to give it body. In high-end tailoring, the entire front panel may receive canvas interfacing.
- Pockets and pocket flaps: Interfacing behind a welt pocket or flap prevents distortion when the pocket is in use.
Bag Making
Bags rely heavily on interfacing to achieve structure. Foam interfacing, such as Soft and Stable by Annie's, is used to create structured tote bags that hold their shape even when empty. Decovil Light provides a leather-like firmness often used for bag bases and straps. Most bag patterns specify the exact interfacing type and weight because the finished appearance of the bag depends on it. Using the wrong interfacing in a bag is one of the most common reasons a finished bag looks soft and shapeless rather than structured and professional.
Home Sewing and Quilting
Curtains and drapes often use interlining (not interfacing) to add weight and opacity. Bump interlining — a soft, fluffy material — is popular in interlined curtains for insulation and a full, luxurious appearance. In quilting, a lightweight interfacing is sometimes applied to fabric blocks that need stabilization before appliqué work or free-motion quilting. Embroidery projects almost always require a stabilizer (a type of interfacing designed specifically for machine embroidery) behind the design area to prevent puckering.
How to Use Interlining in Garment Construction
Interlining is less commonly discussed in home sewing tutorials, but it is an important technique for outerwear, winter garments, and lined curtains. Here is how to work with it properly.
Common Interlining Materials
- Flannel: A soft, woven interlining used in coats and jackets for warmth. It is lightweight, adds minimal bulk, and is easy to sew.
- Fleece: A thicker option for maximum warmth in outerwear. Fleece interlining is popular in quilted and puffer-style jackets.
- Domette: A soft, open-weave interlining used in curtains and formal garments. It adds body without weight.
- Bump: A thick, soft fabric used almost exclusively in interlined curtains to add insulation and a dramatic, full appearance.
- Wadding or batting: Technically a quilting term, but batting is sometimes used as interlining in outerwear and quilted garments for warmth.
Applying Interlining in a Coat or Jacket
- Cut interlining pieces using the same pattern pieces as the outer garment, typically without seam allowances (or with reduced seam allowances) so the interlining does not add bulk in seams.
- Place the interlining on the wrong side of each outer fabric panel.
- Catch-stitch or herringbone-stitch the interlining to the seam allowances of the outer fabric — not through to the right side. This attaches it invisibly and allows the layers to move as one unit.
- Assemble the garment as normal. The interlining is now enclosed between the outer fabric and the lining and will never be visible in the finished garment.
For interlined curtains, the process is slightly different — the bump or domette interlining is locked into the lining fabric using a lock stitch at intervals across the width of each curtain panel, so it hangs as a unified piece without shifting or sliding.
Common Interfacing Problems and How to Fix Them
Even experienced sewists run into interfacing issues. Here are the most frequent problems and their solutions.
Bubbling or Peeling After Washing
This happens when the bond between fusible interfacing and fabric breaks down in the wash. The cause is usually insufficient heat or pressure during application, or using a fusible interfacing that is not compatible with the washing temperature. To prevent it: press longer and with more pressure when applying, and always check that your interfacing and fabric have compatible care requirements. If bubbling has already occurred, you may be able to re-press the area from the right side (using a pressing cloth) to re-activate the adhesive — this works for minor bubbling. For major peeling, the interfacing usually needs to be removed and replaced.
Adhesive Bleed-Through
This appears as shiny spots or stiff patches on the right side of your fabric where the adhesive has seeped through. It is most common on loosely woven fabrics, sheers, and fabrics pressed with too much heat. Prevention is far easier than correction — always use a pressing cloth, and always do a test on a fabric scrap before committing. If bleed-through occurs, there is usually no fix that fully restores the fabric's original appearance.
Interfacing Causing Puckering or Distortion
Puckering after fusing usually means the interfacing has been cut off-grain, or the iron was moved (slid) rather than pressed during application. On woven interfacing, check that the grain of the interfacing aligns with the grain of the fashion fabric. On knit fabrics, use only knit interfacing — a rigid interfacing on stretch fabric will prevent the fabric from stretching and cause rippling or puckering at the seams.
The Interfacing Feels Too Stiff
If the finished area feels rigid and board-like when it should feel supported but drapeable, you have used an interfacing that is too heavy for your fabric. Unfortunately, once fused, heavy interfacing is very difficult to remove without damaging the fashion fabric. Some sewists use a damp cloth and iron on the adhesive side to try to soften the bond, but results vary. Going forward, always test interfacing weight before cutting into your actual project pieces.
The Bond Is Too Weak
If the interfacing peels away easily after application, the heat was not sufficient, the pressing time was too short, or there was not enough pressure. Re-press using higher heat (appropriate for the fabric), a slightly damp pressing cloth, and hold the iron still for a full 10–15 seconds per section. If the interfacing repeatedly fails to bond with a particular fabric — common with fabrics that have a coating, heavy sizing, or a very smooth surface — switch to a sew-in interfacing for that project.
Interfacing for Specific Techniques: Embroidery, Appliqué, and Quilting
Interfacing is not limited to garment sewing. It plays an equally important role in decorative techniques.
Machine Embroidery Stabilizers
Machine embroidery puts enormous stress on fabric — thousands of stitches per design, all pulling at the fabric in different directions. Without a stabilizer (a specialized interfacing) underneath, the fabric puckers, distorts, and the design becomes unreadable. The main stabilizer types are:
- Cut-away stabilizer: Remains in place after stitching; the excess is trimmed away. Used for dense designs and stretchy fabrics. Provides permanent support.
- Tear-away stabilizer: Removed by tearing after stitching. Used for stable woven fabrics with lighter designs.
- Wash-away stabilizer: Dissolves in water after stitching. Useful for freestanding lace, delicate fabrics where no stabilizer should remain, and appliqué placement guides.
- Heat-away stabilizer: Dissolves when pressed with a hot iron. Used for pile fabrics like velvet where other stabilizers would be difficult to remove.
Fusible Web for Appliqué
Fusible web (such as Vliesofix or Heat'n Bond) is a double-sided adhesive sheet used in appliqué. It bonds the appliqué fabric to the background fabric and prevents raw edges from fraying before they are secured with a satin stitch or blanket stitch. Fusible web is technically an interfacing product, but it functions differently from standard interfacing — it is placed between two fabric layers rather than on the wrong side of a single piece, and both sides are adhesive.
Foundation Piecing in Quilting
In foundation paper piecing, quilters sew fabric pieces onto a printed paper template. Some quilters use a lightweight, tear-away interfacing instead of paper, which stays in the quilt block as a stabilizer without adding the stiffness of paper. Wash-away interfacing is another popular option for paper piecing, as it dissolves completely after the quilt is washed.
Practical Tips for Buying and Storing Interfacing
A well-stocked interfacing supply makes every project easier. Here is what experienced sewists recommend.
Build a Small Interfacing Stash
Rather than buying interfacing for each individual project, keep a range of weights on hand. At minimum, stock a lightweight fusible non-woven, a medium-weight fusible woven, a stretch fusible knit, and a general-purpose sew-in. Half a yard to a full yard of each is usually sufficient for most home sewists and will cover the majority of garment projects without a separate shopping trip.
Label Your Interfacing
Interfacing pieces look similar once removed from their packaging. Write the brand name, weight, and type on a piece of masking tape and attach it to each piece before storing. Discovering partway through a project that you have grabbed the wrong weight — or that you have confused your sew-in with your fusible — is a frustrating and avoidable mistake.
Test Before You Cut
This point bears repeating. Always test a small swatch of interfacing on a scrap of your fashion fabric before cutting any pattern pieces. Check the hand, the drape, the bond strength, and whether the fabric's right side is affected in any way. Five minutes of testing can prevent an unrecoverable mistake on an expensive or irreplaceable fabric.
Store Flat or Rolled, Not Folded
Fusible interfacing stored in folds will develop permanent crease lines that transfer to your fabric during pressing. Store interfacing flat on a shelf, or rolled onto a tube (a cardboard gift wrap tube works well). Sew-in interfacing is more forgiving and can be folded carefully without issue.