English
 Español
 Türk
TürkContent
- 1 How to Use Fusible Interfacing: The Direct Answer First
- 2 Understanding What Fusible Interfacing Actually Does to Your Fabric
- 3 Types of Fusible Interfacing and Interlining: Choosing the Right One
- 4 Interfacing Weight: Lightweight, Medium, and Heavyweight Explained
- 5 Step-by-Step: How to Apply Fusible Interfacing Correctly
- 5.1 Step 1: Pre-shrink Both Fabric and Interfacing
- 5.2 Step 2: Cut the Interfacing Accurately
- 5.3 Step 3: Identify the Glue Side
- 5.4 Step 4: Set Up Your Ironing Surface
- 5.5 Step 5: Set the Correct Iron Temperature
- 5.6 Step 6: Use a Press Cloth
- 5.7 Step 7: Press with Firm, Stationary Pressure
- 5.8 Step 8: Flip and Press from the Fabric Side
- 5.9 Step 9: Allow Complete Cooling Before Moving
- 6 Matching Fusible Interfacing and Interlining to Fabric Type
- 7 Where to Use Fusible Interfacing and Interlining in a Garment
- 8 Common Problems When Applying Fusible Interfacing — and How to Fix Them
- 9 Sew-In vs Fusible Interfacing and Interlining: When Each Makes Sense
- 10 Tips for Getting Professional Results with Fusible Interfacing
- 11 How Fusible Interlining Differs from Other Lining and Underlining Methods
- 12 Recommended Fusible Interfacing Products by Application
- 13 Caring for Garments Made with Fusible Interfacing and Interlining
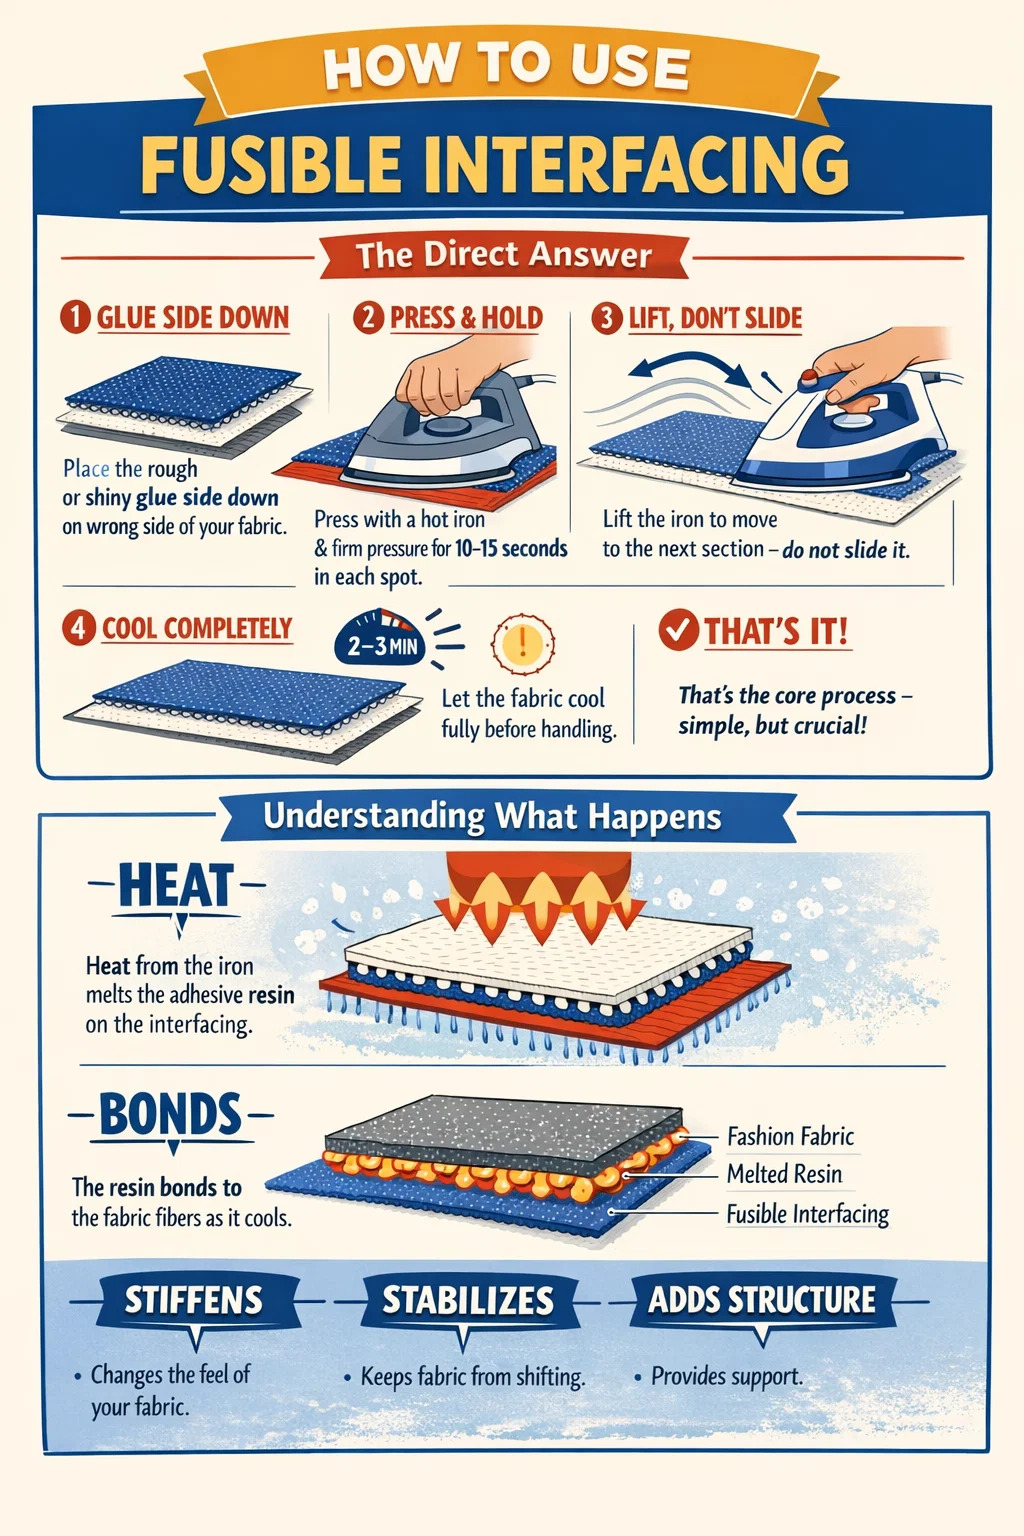
How to Use Fusible Interfacing: The Direct Answer First
Fusible interfacing bonds to fabric using heat from an iron. You place the glue side (the rough or slightly shiny side) face-down onto the wrong side of your fabric, then press with a hot iron using firm, sustained pressure for 10–15 seconds per section. Lift and move the iron — don't slide it. Let the fabric cool completely before handling. That's the core process. Everything else — choosing the right type, prepping your fabric, troubleshooting peeling — builds on top of this foundation.
Fusible interfacing and fusible interlining are often used interchangeably in home sewing, though in the apparel and textile industry, interlining technically refers to a layer inserted between the outer fabric and lining, primarily for warmth or body. In practical sewing terms, both fusible interfacing and fusible interlining serve to stabilize, stiffen, or add structure to fabric — and the application method is the same for both.
Understanding What Fusible Interfacing Actually Does to Your Fabric
Before pressing a single piece, it helps to understand what's happening at the material level. Fusible interfacing has a base — woven, non-woven, or knit — coated on one side with a thermoplastic resin. When heat is applied, that resin melts and penetrates the fibers of your fashion fabric. When it cools, it solidifies and creates a mechanical bond between the two layers.
This bond changes the hand of your fabric. A lightweight cotton that was soft and drapey will become firmer and more structured after fusing. A stretchy knit can be stabilized so it doesn't distort when you stitch a neckline. A collar stand will hold its shape through dozens of wearings and washes.
The key variables that affect how well this bond forms and how the finished result behaves are: iron temperature, steam or no steam, pressure, and dwell time (how long you hold the iron in one spot). Getting these wrong is the single biggest cause of interfacing that bubbles, peels, or fails to adhere at all.
Types of Fusible Interfacing and Interlining: Choosing the Right One
Not all fusible interfacing is created equal. Using the wrong type is one of the most common sewing mistakes — an interfacing that's too stiff will ruin the drape of a blouse, while one that's too light won't give a waistband the support it needs. Here's a breakdown of the main types:
Non-Woven Fusible Interfacing
Made from bonded fibers rather than woven or knit threads. It has no grain line, which means you can cut it in any direction without distortion — a practical advantage when you're cutting many small pieces. Non-woven interfacing tends to be stiffer and less drapey, making it well-suited for structured applications like bag-making, waistbands, and craft projects. It's the most widely available type and is usually what budget interfacing refers to. However, it can crack along fold lines over time, especially in garments that get frequent wear and washing.
Woven Fusible Interfacing
Has a grain just like regular fabric, so you match the grain of the interfacing to the grain of your fashion fabric for the best results. Woven fusible interfacing moves with the fabric rather than against it, which preserves drape far better than non-woven versions. It's ideal for garment construction — shirts, jacket fronts, collar pieces, and anywhere that needs structure without rigidity. Woven interfacing is generally considered the professional standard for garment sewing.
Knit Fusible Interfacing (Tricot)
Designed specifically for stretch fabrics. Tricot interfacing has stretch in one or both directions, which means it moves with jersey, spandex blends, and other stretchy materials rather than restricting them. If you fuse a non-woven or woven interfacing to a knit fabric, you'll lose the stretch entirely — the fabric won't stretch through the seam even if the outer fabric is perfectly fine. Tricot or other knit fusible interfacings solve this problem.
Fusible Interlining for Warmth
Some products marketed as fusible interlining prioritize insulation rather than structure. These are typically used inside outerwear, between the shell fabric and lining, to add warmth without bulk. Thermolam and similar products fall into this category. They're thicker and loftier than standard fusible interfacing, and while they do fuse, the primary purpose is thermal rather than structural.
| Type | Best For | Grain Direction | Stretch |
|---|---|---|---|
| Non-Woven | Bags, crafts, waistbands | None required | None |
| Woven | Garment fronts, collars, cuffs | Match to fabric grain | None |
| Knit / Tricot | Stretch fabrics, knit garments | Match stretch direction | Yes |
| Fusible Interlining | Outerwear, warmth layers | Varies by product | Minimal |
Interfacing Weight: Lightweight, Medium, and Heavyweight Explained
Beyond the construction type, interfacing comes in different weights, and matching weight to fabric is just as important as matching type. A general rule: the interfacing should be the same weight or lighter than your fashion fabric. Going heavier adds stiffness that works against the fabric rather than supporting it.
- Lightweight fusible interfacing — used for fine fabrics like silk, voile, chiffon, or lightweight cotton lawn. It adds just enough body to prevent fraying and help seams lie flat without altering the drape. Pellon 906F is a commonly used lightweight non-woven option.
- Medium-weight fusible interfacing — the workhorse of garment sewing. Suitable for quilting cotton, linen, medium-weight denim, and most dress-weight fabrics. Used on collar pieces, button bands, pocket flaps, and yokes.
- Heavyweight fusible interfacing — for structured elements that need to hold their shape under stress: waistbands, bag bases, hat brims, structured bodices. Also used in tailoring for jacket fronts when a very firm hand is desired, though many tailors prefer non-fusible (sew-in) options for couture work.
When in doubt, cut a small test piece and fuse it to a scrap of your fashion fabric before cutting into your pattern pieces. This test takes two minutes and saves you from committing to a result you don't want.
Step-by-Step: How to Apply Fusible Interfacing Correctly
Here is the full process, from setup to cool-down, covering every detail that affects the quality of the bond.
Step 1: Pre-shrink Both Fabric and Interfacing
Fusible interfacing can shrink when washed, and if it shrinks more than your fashion fabric does, you'll end up with bubbling and puckering after the first laundry cycle. Pre-shrink woven and knit interfacings by soaking them in warm water for 15–20 minutes, then lay flat or hang to dry. Non-woven interfacings are generally more stable and don't require pre-shrinking, but check the manufacturer's instructions. Pre-shrink your fashion fabric at the same time using the same temperature water you plan to wash the finished garment in.
Step 2: Cut the Interfacing Accurately
Cut the interfacing to match your pattern piece exactly, or trim the seam allowances off the interfacing by about 1/8 inch (3mm) on all edges. This trimmed approach prevents bulky seam allowances and makes it easier to press seams open later. For woven interfacing, align the grain of the interfacing to the grain of the fashion fabric piece. For non-woven, this doesn't matter.
Step 3: Identify the Glue Side
The adhesive side of fusible interfacing feels slightly rough or bumpy compared to the smooth other side. In good light, you may be able to see tiny dots of resin. Some interfacings have a slightly shiny coating on the adhesive side. If you're unsure, touch the tip of a hot iron very briefly to each side on a scrap — the adhesive side will stick slightly to the iron (though it shouldn't fuse to it at a brief touch). The adhesive side always faces down, toward the wrong side of your fashion fabric.
Step 4: Set Up Your Ironing Surface
Use a firm ironing board or a wool pressing mat on a flat surface. Padded ironing board covers can compress unevenly under pressure, leaving parts of the interfacing inadequately fused. Place your fashion fabric wrong-side up on the board. Position the interfacing on top, adhesive side down, aligning it carefully with the fabric piece. If you're fusing a large piece, start from the center and work outward to prevent shifting.
Step 5: Set the Correct Iron Temperature
This is where many projects go wrong. Too cool and the resin won't melt and bond. Too hot and you'll scorch delicate fabrics, distort synthetics, or over-fuse the interfacing so it becomes brittle. Follow the interfacing manufacturer's instructions first, then cross-reference with your fabric type:
- Cotton and linen: High heat (cotton setting, around 400°F / 204°C), steam or dry depending on interfacing instructions
- Wool: Medium-high heat, use a press cloth, steam is usually fine
- Silk and lightweight synthetics: Low to medium heat, dry iron, use a press cloth
- Polyester blends: Medium heat, test first — polyester can melt or glaze
- Knits and stretch fabrics: Follow knit interfacing instructions specifically, usually medium heat
Step 6: Use a Press Cloth
A press cloth protects your fabric from direct contact with the iron plate, prevents shine on darker fabrics, and helps distribute heat evenly. Use a piece of thin cotton muslin, a dedicated pressing cloth, or a piece of damp cotton fabric placed over the interfacing. A damp press cloth introduces steam from above, which can improve bonding on interfacings that specify steam. However, be careful with steam on fabrics prone to water spotting.
Step 7: Press with Firm, Stationary Pressure
Place the iron on the press cloth and press straight down with firm, even pressure. Hold for 10–15 seconds. Lift and move to the next section — do not slide the iron across the fabric. Sliding can shift the interfacing out of position before the bond sets. Overlap each pressing position slightly to ensure full coverage. On a standard collar piece of about 6 inches by 3 inches, you'll typically need 3–4 overlapping pressing positions to cover the whole piece.
Step 8: Flip and Press from the Fabric Side
Once you've pressed the entire piece from the interfacing side, flip it over so the fashion fabric is on top. Press again from the right side of the fabric, again using the press cloth and firm pressure. This second press ensures heat penetrates from both directions and activates any resin that may not have fully bonded on the first pass.
Step 9: Allow Complete Cooling Before Moving
The bond isn't fully set until the resin has cooled and solidified. Move the piece too soon and you risk distorting the bond or shifting the interfacing. Leave the fused piece flat on the ironing board for at least 2–3 minutes, or longer for heavier fabrics. Resist the urge to pick it up and check it — this is the step most often skipped, and it's one of the most important.
Matching Fusible Interfacing and Interlining to Fabric Type
Different fabrics react to fusible interfacing in different ways. Knowing the specific challenges of each fabric type helps you avoid common pitfalls.
Cotton and Linen
The most forgiving fabrics for interfacing. Cotton and linen tolerate high heat, fuse reliably, and hold the bond through many wash cycles. Medium-weight woven or non-woven interfacing works well for most cotton garment applications. For quilting cotton, lightweight interfacing often suffices. Always test on a scrap before cutting pattern pieces, as cotton fabrics vary significantly in weave density and treatment.
Silk and Delicate Fabrics
Silk requires a very light touch. Use the lowest-weight interfacing available — often a silk organza non-fusible version is recommended by couture tailors, but if you're using fusible, choose a very lightweight tricot or woven fusible and test extensively. Keep the iron temperature low and use a dry press cloth rather than steam. Avoid using fusible interfacing at all on very fine or antique silks — the heat required can permanently damage the fiber.
Wool and Suiting Fabrics
Woven fusible interfacing designed specifically for tailoring is the professional choice for wool suiting. Products like Vilene or Freudenberg's woven interfacings are used by jacket makers worldwide. The woven construction allows the fabric to maintain some drape and movement while still providing structure. Always use a wool or thick pressing cloth and introduce steam — wool responds well to steam pressing, and a damp press cloth on the top side while pressing promotes excellent bonding.
Stretch and Knit Fabrics
Use only knit (tricot) fusible interfacing on stretch fabrics. Cut the interfacing with the stretch direction matching the stretch direction of the garment piece. Apply with slightly lower heat than you'd use for wovens and avoid stretching the fabric while pressing. A wool pressing mat can be helpful here — it has some give that accommodates the fabric's texture without distorting it.
Synthetic Fabrics: Polyester, Rayon, and Blends
Synthetics are the trickiest group. Polyester melts at relatively low temperatures, so using high heat to fuse interfacing can permanently damage the fabric — creating a glazed or melted surface that can't be repaired. Always test with a scrap first on synthetic fabrics. Use the lowest iron temperature that still achieves bonding, and use a press cloth without fail. Many sewers prefer sew-in interfacing for synthetic fabrics to avoid the heat issue entirely.
Where to Use Fusible Interfacing and Interlining in a Garment
Knowing where to apply interfacing is just as important as knowing how. Under-using it leaves structural elements weak and sloppy; over-using it makes a garment stiff and uncomfortable.
- Collars and collar stands: Always interfaced on at least one half of each piece. The interfacing provides the firmness that lets a collar hold its shape when turned and worn.
- Cuffs: Medium-weight interfacing in at least the outer cuff piece. Cuffs take a lot of wear and washing stress — interfacing prevents them from going limp over time.
- Button bands and buttonhole plackets: Critical areas that need reinforcement to prevent the buttons from pulling the fabric out of shape. Interface the entire band, extending slightly beyond the buttonhole markings.
- Waistbands: Heavyweight or medium-weight interfacing applied to the full length of the waistband. This area takes enormous stress from wearing — the interfacing is what keeps the waistband from stretching and warping after a few wears.
- Jacket and coat fronts: In tailoring, the front of a jacket is interfaced to provide the structure that allows it to drape smoothly over the body. The chest piece and front facing are typically interfaced with a woven or hair canvas (sew-in) interfacing for best results, though fusible is widely used for home sewing.
- Pocket flaps and welt pockets: Small structural elements that benefit from interfacing to maintain their shape. A pocket flap that isn't interfaced will buckle and distort after a few uses.
- Neckline facings: Interface the facing piece before attaching it. This prevents the facing from rolling to the outside and keeps the neckline smooth.
- Zipper areas: Applying a thin strip of lightweight interfacing along the seamline where a zipper will be inserted strengthens the seam and prevents the zipper from pulling the fabric sideways over time.
- Bag bodies and handles: For bag-making, heavyweight fusible interfacing or fusible fleece applied to the outer fabric and handles gives bags their structure. Many bag patterns call for multiple layers.
For fusible interlining used as a warmth layer, it's typically cut to the same shape as the outer shell pieces and either fused to the shell fabric or inserted as a separate floating layer between shell and lining. Quilted fusible interlining is also available, which combines warmth with decorative texture.
Common Problems When Applying Fusible Interfacing — and How to Fix Them
Interfacing Peels or Doesn't Bond
The most common cause is insufficient heat, pressure, or dwell time. If your interfacing is peeling after the first wash or even before, try these fixes: increase the iron temperature slightly and re-press, holding for a full 15 seconds per section. Make sure you're pressing with downward pressure rather than just resting the iron on the surface. A heavier iron or using a tailor's clapper immediately after pressing (to hold heat in while the piece cools) can also improve bonding.
Another cause of poor bonding is fabric finish. Some fabrics, especially those treated with water repellents or stain guards, resist adhesion. Pre-washing the fabric removes many surface treatments. If the fabric has a coating that truly prevents bonding, switch to a sew-in interfacing.
Bubbling and Wrinkling After Washing
Bubbling after the first wash is almost always caused by differential shrinkage — the interfacing and fabric shrank at different rates. The fix is pre-shrinking both materials before fusing. If bubbling has already occurred, you may be able to re-press with a very hot iron and firm pressure to re-bond the layers, but results are inconsistent once the bond has failed.
Interfacing Visible Through the Fabric
With lighter-colored or sheer fabrics, dark or heavily resin-coated interfacing can show through to the right side. The solution is to use white or neutral-colored lightweight interfacing and test it on a scrap held up to light before applying. For very sheer fabrics, a silk organza sew-in interlining is often a better solution than any fusible product.
Adhesive Residue on the Iron
If fusible interfacing gets folded or placed face-up by mistake and contacts the iron directly, adhesive residue bonds to the iron plate. To remove it, heat the iron to medium and rub the sole plate over a folded piece of clean cotton fabric — the adhesive should transfer off. Commercial iron sole plate cleaners also exist for stubborn residue. Prevent this entirely by always using a press cloth.
Fabric Distortion After Fusing
Pressing with a sliding motion instead of a lifting and repositioning motion is the primary cause of fabric distortion during fusing. The sliding action drags the still-soft interfacing and can stretch or warp the fashion fabric. If you're working with a bias-cut piece or a fabric with a lot of give, be especially careful to use a straight up-and-down pressing motion and let the piece cool completely before moving it.
Stiff, Board-Like Result
If your interfaced piece feels overly stiff for its intended purpose, the interfacing weight is too heavy for the fabric or the project. This is particularly common when sewers apply waistband-weight interfacing to collar pieces, or when non-woven interfacing is used on a draped garment front. The only real fix is to remove the interfacing (carefully heat it to re-soften the adhesive, then peel — this works variably depending on how well it bonded) and replace it with a lighter weight.
Sew-In vs Fusible Interfacing and Interlining: When Each Makes Sense
Fusible interfacing is faster and more accessible, but it's not always the right tool. Sew-in interfacing (sometimes called non-fusible or just "interlining" in some contexts) is stitched into the seam allowances and stays in place mechanically rather than adhesively.
- Sew-in is preferred for: Dry-clean-only fabrics (where washing the fusible bond isn't an issue, but the adhesive can deteriorate over many dry cleanings); loose weaves that the iron might distort; heat-sensitive fabrics; couture tailoring where maximum drape and softness is the goal; and heavily textured fabrics like bouclé or heavily embroidered fabric where the surface would prevent complete adhesion.
- Fusible is preferred for: Home sewing where speed matters; machine-washable garments where a well-bonded fusible holds well; bag-making and craft projects; any application where you want a firm, crisp result; and projects using typical cotton and linen fabrics.
In professional apparel manufacturing, the choice between fusible and sew-in interlining depends on the price point of the garment. Fast fashion garments almost universally use fusible interlining because it's applied by automated pressing machines in a fraction of the time that hand-sewing takes. High-end tailored garments, particularly in menswear, still use hand-sewn canvas interlining for the jacket front chest piece, which creates a construction that molds to the wearer's body over time — something fusible cannot replicate.
Tips for Getting Professional Results with Fusible Interfacing
A few habits consistently separate projects where the interfacing looks and feels professional from those where it doesn't.
- Always test on a scrap first. Cut a 3-inch square of interfacing and a 3-inch square of your fashion fabric. Fuse, cool, and evaluate the hand. Wash it once and check for bubbling. Two minutes of testing prevents hours of frustration.
- Use a wool pressing mat. Unlike a standard ironing board, a wool mat provides a firm, slightly yielding surface that absorbs heat and reflects it back into the fabric from below. This dramatically improves bonding consistency, especially on textured fabrics.
- Let the iron fully heat up before you begin. An iron that hasn't reached its full temperature will produce inconsistent results — the first pressing might be underpowered even if subsequent ones are fine.
- Cut interfacing just inside the seam line when you want to eliminate bulk in the seam allowance. This is called "trimming to the seamline" and is standard practice for collars, cuffs, and other structured pieces in well-finished garments.
- Use a tailor's clapper after pressing. A clapper is a dense block of wood that you press firmly onto the just-pressed fabric immediately after removing the iron. It holds the heat in while keeping the fabric flat, which produces a crisper, flatter result than simply letting the fabric cool in the air.
- Store interfacing rolled, not folded. Fold lines in interfacing become visible after application and can't always be pressed out. Keep unused interfacing rolled around a cardboard tube, adhesive side in.
- Read the interfacing manufacturer's instructions, not just general advice. Different brands use different resin formulations that may fuse optimally at slightly different temperatures or with or without steam. The instruction sheet that came with the interfacing is specific to that product.
How Fusible Interlining Differs from Other Lining and Underlining Methods
It's worth clarifying the terminology here, because interlining, interfacing, lining, and underlining are related but distinct concepts that sometimes get used interchangeably in home sewing patterns and tutorials.
- Interfacing — stabilizes specific areas (collars, waistbands, button bands). Usually fused or sewn to the wrong side of individual pattern pieces before garment construction begins.
- Interlining — in technical textile terms, a complete layer between the outer fabric and the lining, typically for warmth or body in outerwear, coats, or structured jackets. A fusible interlining is applied the same way as fusible interfacing but covers entire garment pieces rather than just structural zones.
- Underlining — a layer of fabric cut identically to the fashion fabric and treated as one piece with it through construction. Unlike interfacing, underlining covers the entire fashion fabric piece and is not necessarily fusible — it's often tacked or basted in place. Underlining is common in bridal and couture work to add body to sheer fabrics or support beaded or embroidered fabric.
- Lining — a separate fabric layer that finishes the inside of a garment and covers seam allowances. The lining is a distinct layer, not bonded or fused to the outer fabric.
In modern home sewing patterns, these terms are often simplified: "interfacing" is used to mean any stabilizing fusible or sew-in layer, regardless of the technical distinction between interfacing and interlining. When a pattern calls for interfacing, it means a stabilizing layer applied to specific pieces. When it refers to interlining, it typically means a full warmth layer for an outerwear project.
Recommended Fusible Interfacing Products by Application
With dozens of products on the market, here is a practical overview of widely recommended options organized by use case. Note that availability varies by country, and new products are regularly introduced.
| Application | Recommended Product Type | Notes |
|---|---|---|
| Shirt collars and cuffs | Medium-weight woven fusible | Pellon SF101, Vilene G700 |
| Jacket fronts (home sewing) | Medium-heavy woven fusible | Vilene S320, Pellon Shirt Tailor |
| Stretch garment necklines | Lightweight knit tricot | Pellon Easy-Knit 114, tricot fusible |
| Bags and totes | Heavyweight non-woven or fusible fleece | Pellon 71F, Bosal foam |
| Waistbands | Firm non-woven or woven heavy | Petersham or Ban-Rol for very firm result |
| Outerwear interlining (warmth) | Fusible interlining fleece | Thermolam, Hobbs fusible batting |
| Sheer and lightweight fabrics | Very lightweight non-woven or woven | Pellon 906F, test thoroughly first |
Caring for Garments Made with Fusible Interfacing and Interlining
A properly applied fusible bond is durable, but care practices affect its longevity. Following a few guidelines keeps garments looking structured and professional wash after wash.
- Wash in cool or warm water rather than hot. High wash temperatures can soften the resin bond and lead to delamination over time, especially in cheaper interfacings. Most quality fusible interfacings are designed to withstand machine washing at 40°C (104°F).
- Avoid extended soaking. Leaving interfaced garments soaking for long periods can weaken the bond. A standard machine wash cycle is fine; an overnight soak is not.
- Tumble dry on low or hang dry. High heat in the dryer can degrade the adhesive bond the same way excessive washing temperature can. Line drying or tumbling on low is kinder to interfaced garments.
- Press with a press cloth when ironing. Interfaced areas can develop a shine if ironed directly on the right side. Always use a cloth, especially on collars and cuffs where the interfacing is directly beneath the outer surface.
- Follow the care label of the more delicate of the two materials — fashion fabric or interfacing. If your fashion fabric is cotton but the interfacing is rated for gentle wash only, follow the gentler instruction.
For dry-clean-only garments where fusible interlining has been used, standard dry cleaning solvents are generally safe for the adhesive bond — but repeated dry cleaning over many years can eventually weaken it. This is one reason why very high-end tailored garments, which are expected to last decades, use sew-in interlining rather than fusible.